Mapping target data configuration
Overview
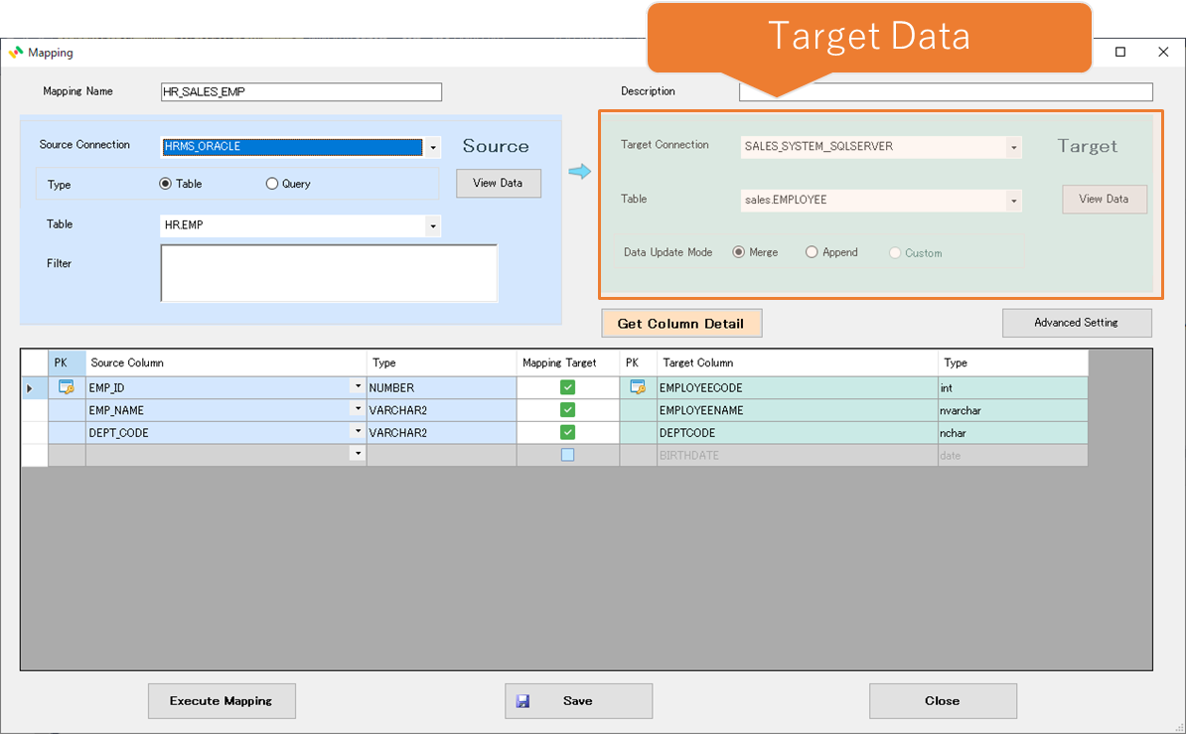
The target data can be selected from RDB, CSV , Excel , JSON or XML.
Before mapping configuration,, complete the connection configuration first.
Configuration

For RDB

| No | Item | Description |
|---|---|---|
| 1 | Target Connection | Select the connection that was configured on the connection configuration form. |
| 2 | Table | Once you have selected the connection, a list of RDB tables will appear, select the table from the list. |
| 3 | Data Update Mode | Select how to update the target table.Merge - Merge the data into the target table using the primary key of the target table as a search condition.If the result is true, then updates the row with the corresponding data from the source table. In case the result is false for any rows, then inserts the corresponding row from the source table into the target table. *If the primary key is not defined on the target table, this method cannot be selected Append - Insert the data into the target table. Custome - Write a SQL statement for updating data. (Do it on the detailed setting form) |
| 4 | View Data | Open a form that allows you to view existing data. |
For CSV

| No | Item | Description |
|---|---|---|
| 11 | CSV Filename | Enter the name for the CSV export file. There are two ways to set, the fixed name and the pattern configuration. 1. If the CSV name is fixed, input the filename as it is. 2. In case of pattern configuration, it is possible to place the output time in the filename. e.g : EMP{yyyyMMddHHmmss}.csvIf you execute the mapping on March 5, 2019 at 6:32:47 p.m., the file name will be EMP20190305183247.csv. Reference:Custom date and time format strings |
| 12 | Encoding | Enter the encoding of the CSV file.<br /e.g.:UTF-8、Shift_JIS |
| 13 | Use header columns | Whether the CSV file has a header row. |
| 14 | Delimiter | Select the delimiter from comma (,) and TAB. |
| 15 | Quoting | You can select from None, single quotation or double quotation. |
| 16 | Transfer Source File as IS | Check this option if the source file is in CSV format and you want to save it as-is without any conversion. |
| Save Raw Response as File | Check this option if the response from the web endpoint is in CSV format and you want to save it as-is without any conversion. | |
| 17 | Use Source File Name | Use the source file name as-is. If the file type differs, the extension will be automatically converted to match the file type. |
For Excel

| No | Item | Description |
|---|---|---|
| 21 | Excel Filename | Enter the name for the Excel export file. There are two ways to set, the fixed name and the pattern configuration. 1. If the Excel name is fixed, input the filename as it is. 2. In case of pattern configuration, it is possible to place the output time in the filename. e.g : EMP{yyyyMMddHHmmss}.xlsxIf you execute the mapping on March 5, 2019 at 6:32:47 p.m., the file name will be EMP20190305183247.xlsx. Reference:Custom date and time format strings |
| 22 | Sheet Name | Specify the sheet name for the output Excel file. |
| 23 | Transfer Source File as IS | Check this option if the source file is in Excel format and you want to save it as-is without any conversion. |
| Save Raw Response as File | Check this option if the response from the web endpoint is in Excel format and you want to save it as-is without any conversion. | |
| 24 | Use Source File Name | Use the source file name as-is. If the file type differs, the extension will be automatically converted to match the file type. |
For JSON

| No | Item | Description |
|---|---|---|
| 31 | JSON Filename | Enter the name for the JSON export file. There are two ways to set, the fixed name and the pattern configuration. 1. If the JSON name is fixed, input the filename as it is. 2. In case of pattern configuration, it is possible to place the output time in the filename. e.g : EMP{yyyyMMddHHmmss}.jsonIf you execute the mapping on March 5, 2019 at 6:32:47 p.m., the file name will be EMP20190305183247.json. Reference:Custom date and time format strings |
| 32 | Root Key | Specify the root object name for the output JSON file. Leaving it empty is allowed. |
| 33 | Transfer Source File as IS | Check this option if the source file is in JSON format and you want to save it as-is without any conversion. |
| Save Raw Response as File | Check this option if the response from the web endpoint is in JSON format and you want to save it as-is without any conversion. | |
| 34 | Use Source File Name | Use the source file name as-is. If the file type differs, the extension will be automatically converted to match the file type. |
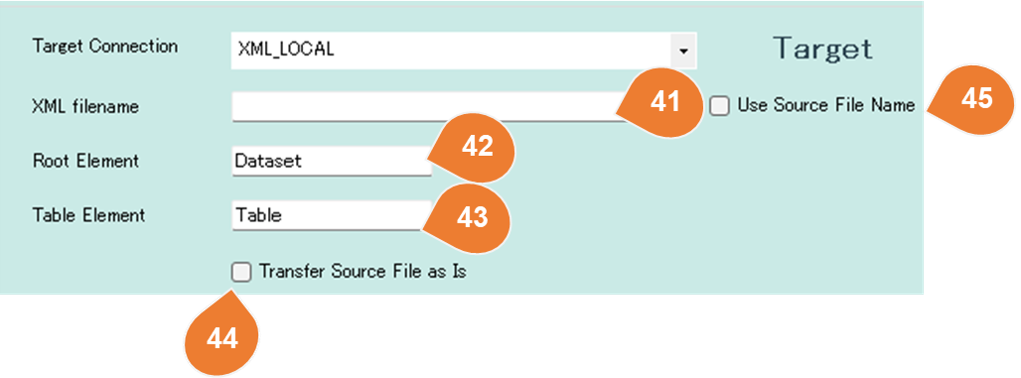
For XML

| No | Item | Description |
|---|---|---|
| 41 | XML Filename | Enter the name for the XML export file. There are two ways to set, the fixed name and the pattern configuration. 1. If the XML name is fixed, input the filename as it is. 2. In case of pattern configuration, it is possible to place the output time in the filename. e.g : EMP{yyyyMMddHHmmss}.xmlIf you execute the mapping on March 5, 2019 at 6:32:47 p.m., the file name will be EMP20190305183247.xml. Reference:Custom date and time format strings |
| 42 | Root Element | Specify the root element name for the output XML file. Empty values are not allowed. |
| 43 | Table Element | Specify the table element name for the output XML file. Empty values are not allowed. |
| 44 | Transfer Source File as IS | Check this option if the source file is in XML format and you want to save it as-is without any conversion. |
| Save Raw Response as File | Check this option if the response from the web endpoint is in XML format and you want to save it as-is without any conversion. | |
| 45 | Use Source File Name | Use the source file name as-is. If the file type differs, the extension will be automatically converted to match the file type. |
